
DR Server / Desktop bundles Servosity Professional's software capabilities with StorageCraft ShadowProtect to provide disaster recovery and offsite data protection to Windows and Linux systems on physical or virtual machines. Giving you the ability to recover systems, applications, and data to the same or different hardware. You can even spin up your image instantly into a virtual environment.
- Download the ShadowProtect SPX installer from the Servosity DR Downloads page
- Login to the ShadowProtect SPX application with your local / domain administrator account
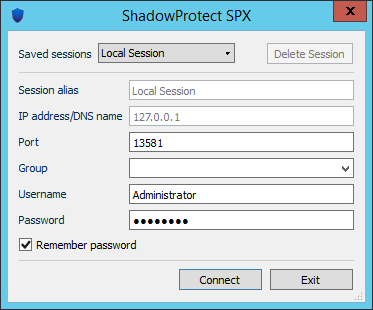
Note: You do not have to modify any of the other login information. - When you launch ShadowProtect SPX, you will need to activate the software with a product key. The key was generated when you created the DR Server / Desktop backup account in the Servosity web portal
(Where to find your ShadowProtect License Key)
Note: The Name and Organization fields are required. - Click the Destinations icon (second from the left
 ). Click Add and select the either network share or local volume. You can manually enter a path or browse for one.
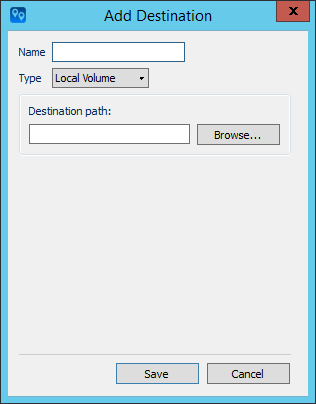
Note: It is part of our best practices when using an network path to use the IP Address instead of the hostname. This eliminates the possibility that a DNS issue could stop local backups.- Click the New Job icon
 .
. - First you will need to set a Job name and destination (should be set from the first step). Leaving a comment is optional.
- Select the volumes that you want to image on this machine. You can only image local disk / volumes and the destination drive cannot be included in the source.
- In most cases it is recommended to use the Standard compression method as this will give you good compression without using more resources.
- For security, we recommend you use a secure encryption key, and keep it safely documented in a secure location. Without the encryption key you won't be able to restore this backup. Note: While ShadowProtect will let you create an encryption key with a space in it, doing so will prevent Advanced Verification (Nightly Screenshot or ChkDsk emails) from working.

Note: Do not lose this password as there is no way to retrieve it. - Next, click the Schedule tab.
- For DR solutions going offsite, it is recommended that you choose a continuous schedule type. We also recommend to run this during your clients’ business hours for the best protection.
- In most cases our partners leave everything as default unless there are specific use cases that you require.
- When you are finished configuring the job, click save.
- If you specified the backup to run immediately (in the Schedule tab) it will queue to run after clicking save.

Note: ShadowProtect must be rebooted before the initial full can be run.- Finally, take a look at this KB article to see how to configure ShadowProtect SPX notifications to report into CheckCentral.
![]()
Proceed to the Next Step: Image Manager (Required)