When restoring a Servosity DR backup as a Virtual Machine, it's best to start with a new VM. Here's some tips to make sure things go smoothly.
Prerequisites
- A Windows Server 2016 - 2022, or Windows 10 - 11 Hyper-V host with sufficient resources (CPU, RAM, and storage)
- Virtualization needs to be enabled in the BIOS and Hyper-V has to be installed/enabled
- Check these articles if you're using a VirtualBox or VMWare host
- A local DR backup chain of the system you want to restore
- If you need to restore the image chain from the cloud, start here
Creating the VM
- Launch the Hyper-V Manager application on your host.
- Create a New VM:
-
- Under the Actions section on the right, select New then Virtual Machine.

- Follow the wizard's prompts, ensuring you choose Generation 2 for the VM type. Don't worry about the other settings right now.

- Under the Actions section on the right, select New then Virtual Machine.
Even if the source system may be using an MBR volume, we recommend selecting Generation 2. A backup of an MBR volume can be restored to a GPT volume without issues.
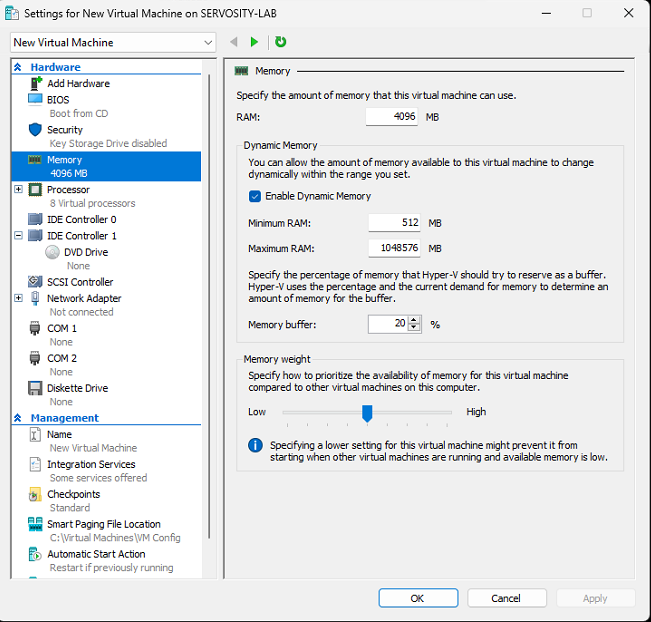
3. Configure Processor and Memory:
-
- Right-click on the new virtual machine, and select Settings
- Make sure you have enough RAM and CPU allocated to the VM

The closer you can get to the original system's allocated resources the better the new VM will run after the restore
Make sure you have enough CPU and RAM available on the host or the VM may not be able to start
4. Create the Virtual Hard Disk:
-
- Still under the Settings page for the new VM, select the SCSI Controller option under the Hardware section
-
-
- Click the New button
- Proceed through the new virtual disk wizard
- Make sure you select VHDX if you did select the Generation 2 VM earlier.
- We recommend choosing Dynamically Expanding for the disk type to optimize the physical disk usage
- Make sure the disk size is at least as large as the source volume.
-
If the volume isn't large enough, you will not be able to restore the backup to it
5. Connect to the network:
-
- Still under the Settings page for the new VM, select the Network Adapter option under the Hardware section
- Select the appropriate Virtual Switch to connect to your network
- If you need advice on creating a new Virtual Switch, check out this article
- Still under the Settings page for the new VM, select the Network Adapter option under the Hardware section
6. Attach the Recovery Environment ISO:
If you haven't created the ISO yet, follow the steps in this article
-
- Still under the Settings page for the new VM, select the DVD Drive option under IDE Controller 1 option in the Hardware section
- Choose the Image file option under Media, then click the Browse button
- Still under the Settings page for the new VM, select the DVD Drive option under IDE Controller 1 option in the Hardware section

-
- Browse to the location of the Recovery Environment ISO and select it
The default location where the ReBuilder puts the ISO is: C:\Users\<Username>\AppData\Local\StorageCraft\ReBuilder
For Servosity Simplified companies, you'll find the ISO already built in the <Backup Storage>\Servosity\Tools folder
6. Finalize and Boot
-
- Click Apply and OK to save the VM settings
- Right-click on the new VM and choose Connect to pop up the console
- Click Start in the console window, click inside the window, then press any key when prompted to boot from the disk image
- If you fail to press a key to boot from the disk image, you can restart the VM to try again
This will boot you into the recovery environment. From here, you can follow the process in this KB article to restore your backup onto this new VM: Using the StorageCraft Recovery Environment to Restore a System Volume
If you have any questions about this, please feel free to contact us at Support@Servosity.com.
